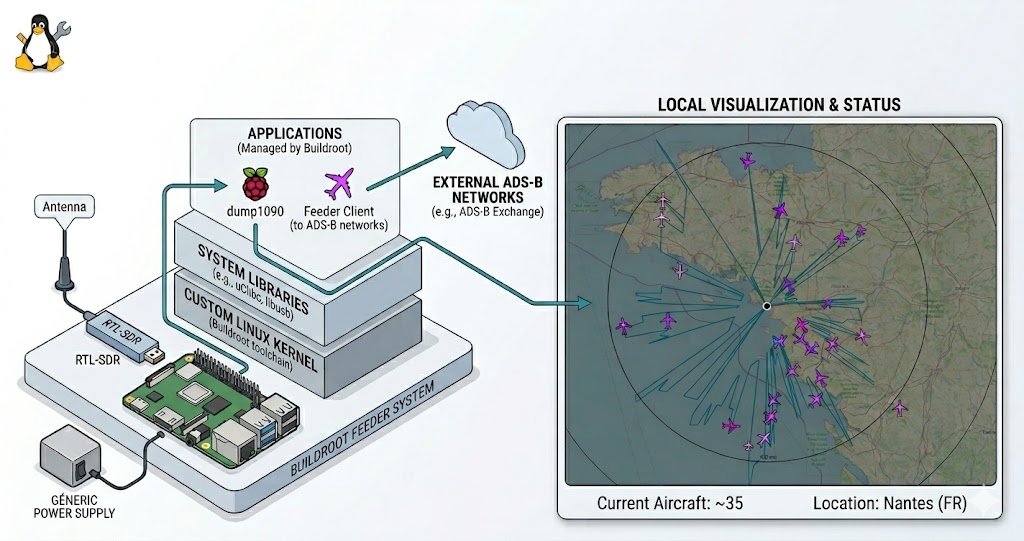
Following our work on maritime AIS, we are now targeting aviation. This guide explains how to build a professional-grade ADS-B station on a Raspberry Pi 3. We are using Buildroot to create a custom Linux firmware that is ultra-lightweight, boots in seconds, and runs entirely in RAM (read-only) to prevent SD card corruption.
1. Project Architecture
We use the BR2_EXTERNAL mechanism to keep our custom logic clean and portable. First, clone the stable Buildroot source:
git clone https://gitlab.com/buildroot.org/buildroot.git
cd buildroot
git checkout 2025.02.13
Our project tree is organized as follows:
.
├── buildroot/             # Official sources (git clone)
├── external-pi/           # Custom recipes layer
│   ├── Config.in
│   ├── external.desc
│   ├── external.mk
│   ├── board/             # <--- Boot configs (config.txt, cmdline.txt)
│   └── package/
│       ├── librtlsdr-blog/
│       ├── mlat-client/
│       └── readsb/
└── overlay/               # System files (Init, Network, Configs)
    ├── etc/
    │   ├── fr24feed.ini
    │   ├── init.d/
    │   │   ├── S50readsb
    │   │   ├── S60fr24
    │   │   ├── S99mlat-client-adsbfi
    │   │   └── S99mlat-client-adsbx
    │   ├── lighttpd/
    │   ├── modprobe.d/
    │   ├── network/
    │   └── wpa_supplicant.conf
    ├── usr/bin/fr24feed
    └── var/www/tar1090
2. The External Layer (external-pi)
These files declare the project to Buildroot:
external-pi/external.desc:
name: PI_FEEDER_EXT
desc: Station ADS-B pour Pi3
external-pi/external.mk:
include $(sort $(wildcard $(BR2_EXTERNAL_PI_FEEDER_EXT_PATH)/package/*/*.mk))
external-pi/Config.in (Menu integration):
source "$BR2_EXTERNAL_PI_FEEDER_EXT_PATH/package/librtlsdr-blog/Config.in"
source "$BR2_EXTERNAL_PI_FEEDER_EXT_PATH/package/readsb/Config.in"
source "$BR2_EXTERNAL_PI_FEEDER_EXT_PATH/package/mlat-client/Config.in"
3. Software Recipes & Compilation
A. Optimized Drivers: librtlsdr-blog
external-pi/package/librtlsdr-blog/Config.in:
config BR2_PACKAGE_LIBRTLSDR_BLOG
	bool "librtlsdr-blog"
	select BR2_PACKAGE_LIBUSB
	help
	  Version optimisée pour RTL-SDR Blog V4 avec support Bias-T.

	  https://github.com/rtlsdrblog/rtl-sdr-blog
external-pi/package/librtlsdr-blog/librtlsdr-blog.mk:
LIBRTLSDR_BLOG_VERSION = master
LIBRTLSDR_BLOG_SITE = $(call github,rtlsdrblog,rtl-sdr-blog,$(LIBRTLSDR_BLOG_VERSION))
LIBRTLSDR_BLOG_LICENSE = GPL-2.0+
LIBRTLSDR_BLOG_INSTALL_STAGING = YES

LIBRTLSDR_BLOG_DEPENDENCIES = libusb

# On active explicitement le détachement du driver kernel (DVB-T)
# et l'installation des outils (rtl_sdr, rtl_biast, etc.)
LIBRTLSDR_BLOG_CONF_OPTS = \
	-DINSTALL_UDEV_RULES=ON \
	-DDETACH_KERNEL_DRIVER=ON

$(eval $(cmake-package))
B. The Decoder: readsb
external-pi/package/readsb/Config.in:
config BR2_PACKAGE_READSB
	bool "readsb"
	select BR2_PACKAGE_LIBRTLSDR_BLOG
	select BR2_PACKAGE_NCURSES
	select BR2_PACKAGE_ZLIB
	select BR2_PACKAGE_ZSTD
	help
	  Readsb est un décodeur ADS-B haute performance.
external-pi/package/readsb/readsb.mk:
READSB_VERSION = master
READSB_SITE = $(call github,wiedehopf,readsb,$(READSB_VERSION))
READSB_DEPENDENCIES = librtlsdr-blog ncurses zlib zstd
READSB_LICENSE = GPL-3.0

# On utilise le hook SED pour les versions
define READSB_FIX_VERSION_MACROS
	sed -i 's/READSB_SHORT_VERSION/"2025"/g' $(@D)/json_out.c
	sed -i 's/READSB_SHORT_COMMIT/"v4"/g' $(@D)/json_out.c
endef
READSB_POST_PATCH_HOOKS += READSB_FIX_VERSION_MACROS

# On passe RTLSDR=yes ET on force le flag de compilation manuellement dans CFLAGS
READSB_MAKE_OPTS = \
	RTLSDR=yes \
	CFLAGS="$(TARGET_CFLAGS) -D_GNU_SOURCE -D_DEFAULT_SOURCE -DENABLE_RTLSDR"

define READSB_BUILD_CMDS
	$(TARGET_MAKE_ENV) $(MAKE) $(TARGET_CONFIGURE_OPTS) -C $(@D) $(READSB_MAKE_OPTS)
endef

define READSB_INSTALL_TARGET_CMDS
	$(INSTALL) -D -m 0755 $(@D)/readsb $(TARGET_DIR)/usr/bin/readsb
	$(INSTALL) -D -m 0755 $(@D)/viewadsb $(TARGET_DIR)/usr/bin/viewadsb
endef

$(eval $(generic-package))
C. MLAT Client
external-pi/package/mlat-client/Config.in:
config BR2_PACKAGE_MLAT_CLIENT
	bool "mlat-client"
	depends on BR2_PACKAGE_PYTHON3
	select BR2_PACKAGE_PYTHON_PYASYNCORE
	select BR2_PACKAGE_PYTHON_PYASYNCHAT²
	select BR2_PACKAGE_PYTHON3_ZLIB
	help
	  Mode S Multilateration client for ADS-B feeders.

	  https://github.com/mutability/mlat-client

comment "mlat-client needs python3"
	depends on !BR2_PACKAGE_PYTHON3
external-pi/package/mlat-client/mlat-client.mk:
MLAT_CLIENT_VERSION = 0.2.13
MLAT_CLIENT_SITE = $(call github,mutability,mlat-client,v$(MLAT_CLIENT_VERSION))
MLAT_CLIENT_LICENSE = GPL-3.0
MLAT_CLIENT_LICENSE_FILES = COPYING
MLAT_CLIENT_SETUP_TYPE = setuptools

$(eval $(python-package))
4. System Configuration (Overlay)
The overlay directory contains custom configuration files and pre-compiled binaries that are merged into the final root filesystem.
Note: Some binaries like
fr24feedand thetar1090web interface files should be placed manually in theoverlay/directory before building if they are not managed by a Buildroot recipe.
Network & WiFi
overlay/etc/network/interfaces:
auto lo
iface lo inet loopback

auto eth0
iface eth0 inet dhcp

auto wlan0
iface wlan0 inet dhcp
    pre-up sleep 2
    wpa-conf /etc/wpa_supplicant.conf
overlay/etc/wpa_supplicant.conf:
country=FR
network={
    ssid="YOUR_SSID"
    psk="YOUR_PASSWORD"
}
overlay/etc/modprobe.d/rtlsdr-blacklist.conf:
blacklist dvb_usb_rtl28xxu
blacklist rtl2832
blacklist rtl2830
Init Scripts (The Automation)
overlay/etc/init.d/S50readsb (The Core Decoder):
#!/bin/sh

DAEMON="readsb"
BINARY="/usr/bin/readsb"
SITE_UUID="YOUR_UUID"

# Arguments finaux
ARGS="--device-type rtlsdr \
      --net \
      --fix \
      --dcfilter \
      --lat YOUR_LAT \
      --lon YOUR_LON \
      --net-ri-port 0 \
      --net-ro-port 30002 \
      --net-bi-port 30004 \
      --net-bo-port 30005 \
      --write-json /tmp/readsb \
      --net-connector feed.adsb.fi,30004,beast_reduce_out,uuid=$SITE_UUID \
      --net-connector feed.adsbexchange.com,30004,beast_reduce_out"

case "$1" in
    start)
        echo -n "Starting $DAEMON: "
        /usr/bin/rtl_biast -b 1 > /dev/null 2>&1
        sleep 1
        start-stop-daemon -S -b -x $BINARY -- $ARGS
        [ $? -eq 0 ] && echo "OK" || echo "FAIL"
        ;;
    stop)
        echo -n "Stopping $DAEMON: "
        start-stop-daemon -K -x $BINARY
        [ $? -eq 0 ] && echo "OK" || echo "FAIL"
        ;;
    restart)
        $0 stop
        sleep 1
        $0 start
        ;;
    *)
        echo "Usage: $0 {start|stop|restart}"
        exit 1
        ;;
esac
overlay/etc/init.d/S99mlat-client-adsbx (Feed ADSBExchange):
#!/bin/sh
NAME="mlat-client-adsbx"
DAEMON="/usr/bin/mlat-client"
PIDFILE="/var/run/$NAME.pid"

ARGS="--input-type dump1090 \
      --input-connect 127.0.0.1:30005 \
      --lat YOUR_LAT \
      --lon YOUR_LON \
      --alt 45m \
      --user YOUR_USER \
      --server feed.adsbexchange.com:31090 \
      --no-udp \
      --results beast,connect,127.0.0.1:30004"

case "$1" in
  start)
        echo -n "Starting $NAME: "
        start-stop-daemon -S -q -b -m -p $PIDFILE -x $DAEMON -- $ARGS
        echo "OK"
        ;;
  stop)
        echo -n "Stopping $NAME: "
        start-stop-daemon -K -q -p $PIDFILE
        echo "OK"
        rm -f $PIDFILE
        ;;
  restart)
        $0 stop
        sleep 1
        $0 start
        ;;
  *)
        echo "Usage: $0 {start|stop|restart}"
        exit 1
        ;;
esac
overlay/etc/init.d/S99mlat-client-adsbfi (Feed ADSB.fi):
#!/bin/sh
NAME="mlat-client-adsbfi"
DAEMON="/usr/bin/mlat-client"
PIDFILE="/var/run/$NAME.pid"

ARGS="--input-type dump1090 \
      --input-connect 127.0.0.1:30005 \
      --lat YOUR_LAT \
      --lon YOUR_LON \
      --alt 45m \
      --user YOUR_USER \
      --server feed.adsb.fi:31090 \
      --no-udp \
      --results beast,connect,127.0.0.1:30004"

case "$1" in
  start)
        echo -n "Starting $NAME: "
        start-stop-daemon -S -q -b -m -p $PIDFILE -x $DAEMON -- $ARGS
        echo "OK"
        ;;
  stop)
        echo -n "Stopping $NAME: "
        start-stop-daemon -K -q -p $PIDFILE
        echo "OK"
        rm -f $PIDFILE
        ;;
  restart)
        $0 stop
        sleep 1
        $0 start
        ;;
  *)
        echo "Usage: $0 {start|stop|restart}"
        exit 1
        ;;
esac
overlay/etc/init.d/S60fr24 (FlightRadar24 Feed):
#!/bin/sh
DAEMON="fr24feed"
BINARY="/usr/bin/fr24feed"

case "$1" in
    start)
        echo -n "Starting $DAEMON: "
        sleep 2
        start-stop-daemon -S -b -x $BINARY
        [ $? -eq 0 ] && echo "OK" || echo "FAIL"
        ;;
    stop)
        echo -n "Stopping $DAEMON: "
        start-stop-daemon -K -x $BINARY
        [ $? -eq 0 ] && echo "OK" || echo "FAIL"
        ;;
    restart)
        $0 stop
        sleep 1
        $0 start
        ;;
    *)
        echo "Usage: $0 {start|stop|restart}"
        exit 1
        ;;
esac
Feeder Configurations
overlay/etc/fr24feed.ini:
receiver="beast-tcp"
fr24key="YOUR_FR24_KEY"
host="127.0.0.1:30005"
bs="no"
raw="no"
logmode="1"
logpath="/tmp"
mlat="yes"
mlat-without-gps="yes"
overlay/etc/lighttpd/lighttpd.conf (Web Interface):
server.modules += ( "mod_alias", "mod_setenv" )
server.document-root        = "/var/www/tar1090"
server.port                 = 80
index-file.names            = ( "index.html" )

mimetype.assign = (
  ".html" => "text/html",
  ".css"  => "text/css",
  ".js"   => "application/javascript",
  ".json" => "application/json",
  ".png"  => "image/png",
  ".svg"  => "image/svg+xml"
)

alias.url += ( "/data/" => "/tmp/readsb/" )

$HTTP["url"] =~ "^/data/" {
    setenv.add-response-header = ( "Cache-Control" => "no-cache, no-store, must-revalidate" )
}
5. RAM-Only Boot Configuration
To run the OS entirely in RAM, we use the initramfs strategy. This loads the rootfs.cpio.gz into the Raspberry Pi’s memory at boot time. You have two options to implement this:
Method A: Automated (Buildroot Integration)
This is the professional way. The files are generated correctly every time you run make.
Prepare your custom board files: Create a folder
external-pi/board/and create two files:external-pi/board/config.txt:
# RAM Boot Config initramfs rootfs.cpio.gz followkernel # Enable UART for console enable_uart=1external-pi/board/cmdline.txt:
console=serial0,115200 console=tty1 root=/dev/ram0 rw rootwaitConfigure Buildroot (
make menuconfig):- Filesystem images:
- Enable
cpio the root file system. - Compression:
gzip.
- Enable
- Target packages -> Hardware handling:
- Select
rpi-firmware. - Set
Configuration fileto$(BR2_EXTERNAL_PI_FEEDER_EXT_PATH)/board/config.txt.
- Select
- System configuration:
- Set
Custom scripts to run after creating the imagesto point to a script that copies yourcmdline.txtto the output folder (or use the default RPi post-image script and point it to your custom file).
- Set
- Filesystem images:
Method B: Manual (Quick Edit on SD Card)
If you don’t want to touch Buildroot files, you can edit the files on the SD card after flashing.
- Flash the SD card as described in Section 7.
- Mount the BOOT partition on your PC.
- Edit
config.txt: Add the lineinitramfs rootfs.cpio.gz followkernel. - Edit
cmdline.txt: Replace the content withconsole=serial0,115200 console=tty1 root=/dev/ram0 rw rootwait.
Note: The Buildroot files in buildroot/board/raspberrypi/ are templates. You should never edit them directly; always use a custom board directory in your external-pi layer as shown in Method A.
6. Buildroot Setup Checklist
Enable these options in make menuconfig to match our project’s requirements:
- Target options: Cortex-A53, NEON-VFPV4, Hard float (EABIhf), instructions ARM (not Thumb2).
- Toolchain:
Glibclibrary, Linux Headers6.6.x,GCC 13.x,Binutils 2.43.x. EnableWchar,Locale, andC++support. - Kernel: Custom Raspberry Pi kernel (
bcm2709_defconfig) using the 6.6.y branch. EnableDevice Treesupport andDTB overlay support. - System Configuration:
Root loginenabled (password:root).DHCPenabled oneth0.BR2_ROOTFS_OVERLAYpointing to youroverlay/directory.Purge locale(C, en_US).
- WiFi Stack:
linux-firmware -> Broadcom BCM43xxx&Cypress CYW43xxx. - Networking:
lighttpd(withzlib),dropbear(SSH),wpa_supplicant(withnl80211),chrony(NTP sync). - Tools:
bash,python3(withzlib,unicodedata,pyasyncore,pyasynchat),socat,kmod(tools),ca-certificates. - Libraries:
libusb,ncurses,readline,zlib,zstd,xxhash. - Filesystem:
cpiowithgzipcompression.
7. Deployment
Method A: Manual SD Formatting
# Format 1 FAT32 partition on SD card
sudo mkfs.vfat -F 32 -n BOOT /dev/sdX1
# Copy boot images from output/images/
sudo cp zImage rootfs.cpio.gz bcm2710-rpi-3-b.dtb rpi-firmware/* /mnt/sdcard/
Method B: Network Deployment (Fast Iteration)
# Update your running Pi remotely
scp -O output/images/zImage output/images/rootfs.cpio.gz \
       output/images/bcm2710-rpi-3-b.dtb root@192.168.1.123:/boot/
ssh root@192.168.1.123 "reboot"
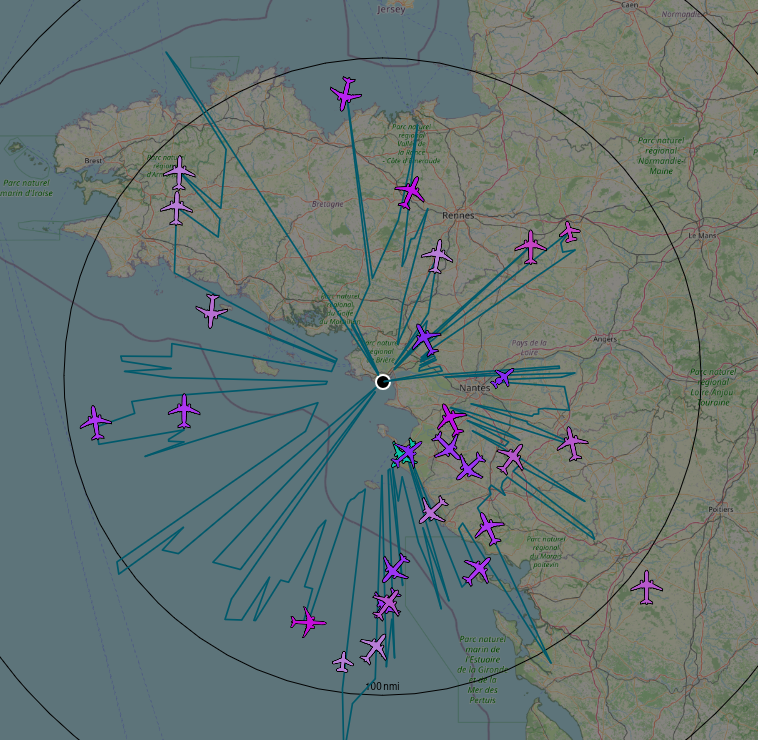
8. Results & Performance
Once the station is up and running, you can access the local web interface (tar1090) to view real-time traffic. The custom Buildroot firmware ensures extremely low CPU usage and high stability.